


Docker is one of the most popular tools for application containerization. Docker enables efficiency and reduces operational overheads so that any developer, in any dev environment, can build stable and reliable applications.
Let’s take a look at Docker, starting with application development before Docker.
Software development today
One common challenge for DevOps teams is managing an application’s dependencies and technology stack across various cloud and development environments. As part of their routine tasks, they must keep the application operational and stable—regardless of the underlying platform that it runs on.
Development teams, on the other hand, focus on releasing new features and updates. Unfortunately, these often compromise the application’s stability by deploying codes that introduce environment-dependent bugs.
To avoid this inefficiency, organizations are increasingly adopting a containerized framework that allows designing a stable framework without adding:
Complexity
Vulnerabilities
Operational loose ends
Put simply, containerization is the process of packaging an application’s code—with dependencies, libraries, and configuration files that the application needs to launch and operate efficiently—into a standalone executable unit.
Initially, containers didn’t gain much prominence, mostly due to usability issues. However, since Docker entered the scene by addressing these challenges, containers have become practically mainstream.
What are containers?
The industry standard today is to use Virtual Machines (VMs) to run software applications. VMs run applications inside a guest Operating System, which runs on virtual hardware powered by the server’s host OS.
VMs are great at providing full process isolation for applications: there are very few ways a problem in the host operating system can affect the software running in the guest operating system, and vice-versa. But this isolation comes at great cost — the computational overhead spent virtualizing hardware for a guest OS to use is substantial.
Containers take a different approach: by leveraging the low-level mechanics of the host operating system, containers provide most of the isolation of virtual machines at a fraction of the computing power.
What is Docker?
Docker is an open platform for developing, shipping, and running applications. Docker is a set of platform-as-a-service products that use OS-level virtualization to deliver software in packages called containers. The service has both free and premium tiers. The software that hosts the containers is called Docker Engine. It was first started in 2013 and is developed by Docker, Inc.
Unlike virtual machines, Docker containers offer:
OS-level abstraction with optimum resource utilization
Interoperability
Efficient build and test
Faster application execution
Fundamentally, Docker containers modularize an application’s functionality into multiple components that allow deploying, testing, or scaling them independently when needed.
Take, for instance, a Docker containerized database of an application. With such a framework, you can scale or maintain the database independently from other modules/components of the application without impacting the workloads of other critical systems.
Docker Architecture
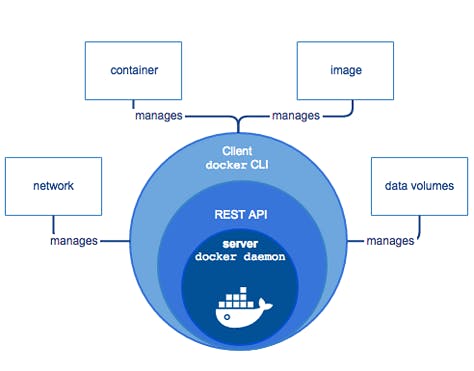
Architecture of docker
Docker comprises the following different components within its core architecture:
Images
Containers
Registries
Docker Engine
Images
Images are like blueprints containing instructions for creating a Docker container. Images define:
Application dependencies
The processes that should run when the application launches
You can get images from DockerHub or create your images by including specific instructions within a file called Dockerfile.
Containers
Containers are live instances of images on which an application or its independent modules are run.
In an object-oriented programming analogy, an image is a class and the container is an instance of that class. This allows operational efficiency by allowing you to multiple containers from a single image.
Registries
A Docker registry is like a repository of images.
The default registry is the Docker Hub, a public registry that stores public and official images for different languages and platforms. By default, a request for an image from Docker is searched within the Docker Hub registry.
You can also own a private registry and configure it to be the default source of images for your custom requirements.
Docker Engine
The Docker Engine is of the core components of the Docker architecture on which the application runs. You could also consider the Docker Engine as the application that’s installed on the system that manages containers, images, and builds.
A Docker Engine uses a client-server architecture and consists of the following sub-components:
The Docker Daemon is the middleware that runs on the host machine. It is responsible for building and managing Docker images. It is also responsible for communication between the docker engine and user.
The Docker Client is a command-line interface (CLI) for sending instructions to the Docker Daemon using special Docker commands. Though a client can run on the host machine, it relies on Docker Engine’s REST API to connect remotely with the daemon.
A REST API supports interactions between the client and the daemon.
GETTING STARTED
Prerequisites
There are no specific skills needed for this tutorial beyond a basic comfort with the command line and using a text editor. This tutorial uses git clone to clone the repository locally. If you don't have Git installed on your system, either install it or remember to manually download the zip files from Github. Prior experience in developing web applications will be helpful but is not required. As we proceed further along the tutorial, we'll make use of a few cloud services. If you're interested in following along, please create an account on each of these websites:
Setting up your computer
Getting all the tooling set up on your computer can be a daunting task, but thankfully as Docker has become stable, getting Docker up and running on your favourite OS has become very easy.
Until a few releases ago, running Docker on OSX and Windows was quite a hassle. Lately, however, Docker has invested significantly into improving the onboarding experience for its users on these OSes, thus running Docker now is a cakewalk. The getting started guide on Docker has detailed instructions for setting up Docker on Mac, Linux and Windows.
Once you are done installing Docker, test your Docker installation by running the following:
$ docker run hello-world

Hello from Docker.
This message shows that your installation appears to be working correctly.
...
HELLO WORLD
Playing with Busybox
Now that we have everything set up, it's time to get our hands dirty. In this section, we are going to run a Busybox container on our system and get a taste of the docker run command.
To get started, let's run the following in our terminal:
$ docker pull busybox
Note: Depending on how you've installed docker on your system, you might see a
permission deniederror after running the above command. If you're on a Mac, make sure the Docker engine is running. If you're on Linux, then prefix yourdockercommands withsudo. Alternatively, you can create a docker group to get rid of this issue.
The pull command fetches the busybox image from the Docker registry and saves it to our system. You can use the docker images command to see a list of all images on your system.
$ docker images
REPOSITORY              TAG                 IMAGE ID            CREATED             VIRTUAL SIZE
busybox                 latest              c51f86c28340        4 weeks ago         1.109 MB
Docker Run
Great! Let's now run a Docker container based on this image. To do that we are going to use the almighty docker run command.
$ docker run busybox
$
Wait, nothing happened! Is that a bug? Well, no. Behind the scenes, a lot of stuff happened. When you call run, the Docker client finds the image (busybox in this case), loads up the container and then runs a command in that container. When we run docker run busybox, we didn't provide a command, so the container booted up, ran an empty command and then exited. Well, yeah - kind of a bummer. Let's try something more exciting.
$ docker run busybox echo "hello from busybox"
hello from busybox
Nice - finally we see some output. In this case, the Docker client dutifully ran the echo command in our busybox container and then exited it. If you've noticed, all of that happened pretty quickly. Imagine booting up a virtual machine, running a command and then killing it. Now you know why they say containers are fast! Ok, now it's time to see the docker ps command. The docker ps command shows you all containers that are currently running.
$ docker ps
CONTAINER ID        IMAGE               COMMAND             CREATED             STATUS              PORTS               NAMES
Since no containers are running, we see a blank line. Let's try a more useful variant: docker ps -a
$ docker ps -a
CONTAINER ID        IMAGE               COMMAND             CREATED             STATUS                      PORTS               NAMES
305297d7a235        busybox             "uptime"            11 minutes ago      Exited (0) 11 minutes ago                       distracted_goldstine
ff0a5c3750b9        busybox             "sh"                12 minutes ago      Exited (0) 12 minutes ago                       elated_ramanujan
14e5bd11d164        hello-world         "/hello"            2 minutes ago       Exited (0) 2 minutes ago                        thirsty_euclid
So what we see above is a list of all containers that we ran. Do notice that the STATUS column shows that these containers exited a few minutes ago.
You're probably wondering if there is a way to run more than just one command in a container. Let's try that now:
$ docker run -it busybox sh
/ # ls
bin   dev   etc   home  proc  root  sys   tmp   usr   var
/ # uptime
 05:45:21 up  5:58,  0 users,  load average: 0.00, 0.01, 0.04
Running the run command with the -it flags attach us to an interactive tty in the container. Now we can run as many commands in the container as we want. Take some time to run your favourite commands.
Danger Zone*: If you're feeling particularly adventurous you can try
rm -rf binin the container. Make sure you run this command in the container and *not in your laptop/desktop. Doing this will make any other commands likels,uptimenot work. Once everything stops working, you can exit the container (typeexitand press Enter) and then start it up again with thedocker run -it busybox shcommand. Since Docker creates a new container every time, everything should start working again.
That concludes a whirlwind tour of the mighty docker run command, which would most likely be the command you'll use most often. It makes sense to spend some time getting comfortable with it. To find out more about run, use docker run --help to see a list of all flags it supports. As we proceed further, we'll see a few more variants of docker run.
Before we move ahead though, let's quickly talk about deleting containers. We saw above that we can still see remnants of the container even after we've exited by running docker ps -a. Throughout this tutorial, you'll run docker run multiple times and leaving stray containers will eat up disk space. Hence, as a rule of thumb, I clean up containers once I'm done with them. To do that, you can run the docker rm command. Just copy the container IDs from above and paste them alongside the command.
$ docker rm 305297d7b135 ff0a5c3750b7
305297d7b135
ff0a5c3750b7
On deletion, you should see the IDs echoed back to you. If you have a bunch of containers to delete in one go, copy-pasting IDs can be tedious. In that case, you can simply run -
$ docker rm $(docker ps -a -q -f status=exited)
This command deletes all containers that have a status of exited. In case you're wondering, the -q flag, only returns the numeric IDs and -f filters output based on conditions provided. One last thing that'll be useful is the --rm flag that can be passed to docker run which automatically deletes the container once it's exited from. For one-off docker runs, --rm flag is very useful.
In later versions of Docker, the docker container prune command can be used to achieve the same effect.
$ docker container prune
WARNING! This will remove all stopped containers.
Are you sure you want to continue? [y/N] y
Deleted Containers:
4a7f7eebae0f63178aff7eb0aa39f0627a203ab2df258c1a00b456cf20063
f98f9c2aa1eaf727e4ec9c0283bcaa4762fbdb

Total reclaimed space: 212 B
Lastly, you can also delete images that you no longer need by running docker rmi.
Docker alternatives
Although Docker is one of the most popular choices for application containerization, there are alternatives:
Containerd: Originally a tool that was part of the Docker ecosystem, this Docker alternative has morphed into its own high-level container runtime. Unlike Docker, which handles network plugins and overlays, Containerd abstracts these functionalities and focuses on running and managing images.
LXC/LXD Linux Containers: An open-source containerization platform with a set of language bindings, libraries, and tools that enables the creation and management of virtual environments. Being tightly bound to the Linux ecosystem, its adoption rate is comparatively limited.
Core OS rkt: Pronounced as “rocket”, this is another open-source software containerization alternative to Docker. An essential feature of rkt is that it is arguably a more secure containerization platform that fixes some of the vulnerable flaws within Docker’s design.
A few other lesser-known alternatives include OpenVz and RunC.
CONCLUSION
And that's a wrap! After a long, exhaustive but fun tutorial you are now ready to take the container world by storm! If you followed along till the very end then you should be proud of yourself. You learned how to set up Docker, run your containers, play with static and dynamic websites and most importantly got hands-on experience with deploying your applications to the cloud!
I hope that finishing this tutorial makes you more confident in your abilities to deal with servers. When you have an idea for building your next app, you can be sure that you'll be able to get it in front of people with minimal effort.
Next Steps
Your journey into the container world has just started! My goal with this tutorial was to whet your appetite and show you the power of Docker. In the sea of new technology, it can be hard to navigate the waters alone and tutorials such as this one can provide a helping hand. This is the Docker tutorial I wish I had when I was starting. Hopefully, it served its purpose of getting you excited about containers so that you no longer have to watch the action from the sides.